These are the projects we'll be making for my Christmas gift class. You have 3 class times to choose from:Thursday December 2 at 10:30 or 7:00 or Saturday December 4 at 1:00.
Santa Post-it Bag $2.00
Snowman Lantern $2.50
Acrylic Ornament $2.50
Hand-stamped Candle $3.50
Tags and Treats $4.00
Contains 8 gift tags and 3 Hershey nuggets all in a pretty box.
Card Set $5.00 (4 All Occasion cards plus envelopes and a box)
Christmas card set $6.00 (4 cards, envelopes and a box)
You can register for them online by clicking on the link at the top called "Christmas Gift Class" or call me to reserve your spot and your projects.
Monday, November 15, 2010
Saturday, November 13, 2010
Halloween recap
So for my Halloween classes this year, we made a few cute projects. This one I've done before and it was a hit again. You can find the basic measurements on this post.
These are the treats we made to go in the bag. You may think these are York peppermint patties, but you would be wrong. York doesn't make the round wrappers anymore, so I found an off brand at the grocery store. The mummy in the middle was totally copied from one I saw on an SU demo only site, but the others were either completely my idea (purple people eater and pumpkin) or adapted from other ideas I saw.
And this is the card we made. I'm not a huge fan of Halloween, so I don't own any Halloween stamps, so we had to do projects using mostly punches. I did have a spider web embossing folder, so after running it through the cuttlebug I sponged silver shimmer paint over the image. Then we made the spider with the scallop punch and corner punch for the legs and 1/2 inch circle for the eyes.
Tuesday, September 28, 2010
Watercolor Trio
Monday, September 27, 2010
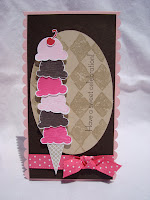
Double Scoop
Isn't this the cutest card. The stamp set is retired now, but it is so cute. I cased the card from this blog, but played with the size and the scallops until it was big enough to fit in the envelop I had. Ack, so fun.
Wednesday, September 1, 2010
Punched posies
These are more images from that same set as the butterflies (see previous post). I found inspiration for this card here. I used the same stamp set and color combo (except the original had orange, and I don't like orange), but changed the sentiment, flower image, and placement of elements.
And this is a completely different feel using darker colors and some clear and white embossing powder. I really like this card and am thinking, if I get a chance I would like to make a few more with different colors. This card is similar to one I saw on this blog.
Monday, August 30, 2010
Butterflies
I love butterflies and any stamp set with a butterfly I have to have, especially if it's on the more whimsical side. The idea for these first two cards came from this blog here although I've made a few changes on each one. Mostly they are just really fun.
This one is an almost exact CASE of one I saw here. It was just to cute not to copy.
It's very, very sparkly. You can click on the picture for a larger image and more detailed shot. There are a few more cards using other images in this stamp set coming in my next post.
This one is an almost exact CASE of one I saw here. It was just to cute not to copy.
It's very, very sparkly. You can click on the picture for a larger image and more detailed shot. There are a few more cards using other images in this stamp set coming in my next post.
Saturday, August 28, 2010
Because I Care
This stamp set isn't one I would have ordered, but it came free so I started playing around with it. It really is beautiful and I've been trying some watercoloring techniques with it. For this card, I stamped it in a dark purple and dark green, then colored it in with lighter colors. Then, I used a darker purple to color the centers of some of the flowers and finally added white gel pen highlights to those centers. This is an on my own original.
On this one, I left the flower plain after stamping it in blue and green. I didn't have any matching ribbon so I picked some that was close, but I don't think it's close enough. I may go back and change it. I got the idea for this card from a blog, but I can't find it anymore.
Thursday, August 26, 2010
On my own
I made this card all on my own, no sketch, no color inspiration, just two coordinating papers that I really like and a determination to use them. You might be wondering why I used green cardstock and flower center. While it's hard to see in the picture, some of the stitching on the flowers and stripes is this bright green. The faux stitching is a little messy, I need to go a little slower next time, but the more I look at it, the more I like it.
Tuesday, August 24, 2010
Technique:Bargello
I came across this technique a few weeks ago called Bargello. I guess it's a sewing or quilting technique. Anyway, you take striped paper, cut it into strips of varying lengths and then glue them down, varying the placement. You can watch the video I watched here on this blog.
This is actually my second attempt. The layout was for a sketch challenge, but I forgot to post it.
This is my third attempt. I like the bargello on this the best, but I don't like the layout, but it was quick.
This is my first attempt, I like the wavy pattern I was beginning (from the left), but I should have kept it going. I used my Color Coach to determine colors for the card above and below and I have to say, I don't like either color combo.
But the technique is fun and I'll probably be trying it again.
Saturday, July 31, 2010
More Tart and Tangy
I had my first workshop last Thursday. I was trying to highlight this stamp set and have some examples, so I went looking for some inspiration. I found a card here and changed it up a little, printed the sentiment on the computer and glittered up the edges of the fruit. This is my favorite of these cards.
Then I saw this card and I copied it almost exactly except I embossed the yellow with the vine embossing folder. Then I used green chalks to highlight the vines, but it doesn't really show up. Then I put Crystal Effects on the strawberries, so they are shiny. This sentiment is also computer generated.
But when I was finished, I didn't like it as much as I thought I would so I thought I'd change it up a bit. I kept the layout the same, but changed everything else up. The DSP is retired, and I used Crystal Effects on the cherries again. I like this one much better.
And for this one, I used a sketch (but I can't find the link anymore). Not sure I love the sketch, but I like the curly vine and the popped up strawberry "hat." I'll have to try that strawberry on another card.
And this idea I found here. Makes really cute, really fast thank you cards.
I'm really loving this stamp set and I have a few more projects in the works that I'll be showing soon.
Thursday, July 22, 2010
Tart & Tangy
Sunday, July 18, 2010
Birthday Card
This is the card I made for my mom's birthday. I found the idea here, but changed a few things, like the colors and the sentiment and the punched edge. I loved this card so much I made three more in different colors with different sentiments. I think the pearls in the middle of the flowers give it a nice touch of elegance.
Subscribe to:
Posts (Atom)